Learn how to overclock the Nvidia RTX 4090 graphics card step-by-step and maximize your gaming performance. Discover tips, tricks, and precautions to optimize your overclocking potential without compromising your hardware.
The Nvidia RTX 4090 is the most powerful graphics card on the market, capable of running any game at 4K resolution with ultra settings and ray tracing. However, if you want to squeeze even more performance out of this beast, you can try overclocking it and see how far it can go.
Overclocking is the process of increasing the clock speeds of your GPU and memory beyond their factory settings, resulting in higher frame rates and better graphics quality. However, overclocking also comes with some risks, such as higher temperatures, power consumption, and potential instability or damage to your hardware. Therefore, you should always overclock with caution and monitor your system carefully.
In this article, I will show you how to overclock your Nvidia RTX 4090 step-by-step, using the EVGA Precision X1 software and some benchmarks to test the results. I will also give you some tips and tricks to optimize your overclocking potential and avoid common pitfalls. Let’s get started!
Step 1: Prepare Your System
Before you start overclocking your RTX 4090, you need to make sure your system is ready for it. Here are some things you should do:
• Update your drivers: Make sure you have the latest Nvidia drivers installed for your RTX 4090. You can download them from Nvidia’s website or use GeForce Experience to update them automatically.
• Update your BIOS: Make sure you have the latest BIOS version for your motherboard. You can check your BIOS version by entering the BIOS setup menu (usually by pressing F2 or Del during boot) or using a utility like CPU-Z. You can download the latest BIOS version from your motherboard manufacturer’s website and follow their instructions to update it.
• Connect your power cables: The RTX 4090 requires a lot of power to run, so you need to make sure you have enough power cables connected to it. The RTX 4090 Founders Edition comes with a special adapter that allows you to connect four 8-pin PCIe power cables from your power supply. Alternatively, you can use a single 12VHPWR cable if your power supply supports it. Make sure all the cables are securely plugged in and not loose or bent.
• Check your cooling: Overclocking will increase the heat output of your GPU, so you need to make sure you have adequate cooling for it. The RTX 4090 Founders Edition has a triple-fan cooler that should be sufficient for most cases, but you can also use a custom water-cooling loop or an aftermarket air cooler if you want better cooling performance. You should also make sure your case has good airflow and ventilation, and clean any dust or debris from your fans and heatsinks.
• Backup your data: Overclocking can sometimes cause crashes or data corruption, so it’s always a good idea to backup your important data before you start tinkering with your GPU settings. You can use an external hard drive, a cloud service, or a backup software to backup your files.
Step 2: Download EVGA Precision X1
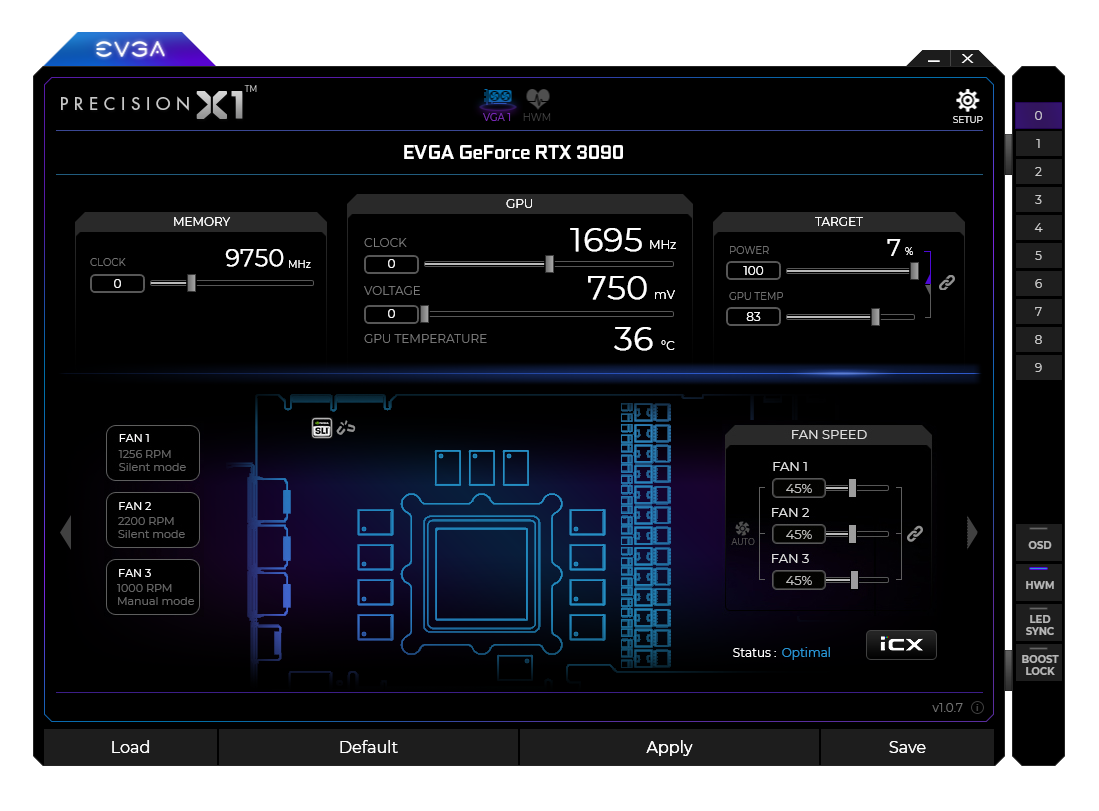
EVGA Precision X1 is a software that allows you to adjust various parameters of your GPU, such as power limit, fan speed, voltage, core clock, and memory clock. It also has a built-in scanner that can automatically find the optimal overclock settings for your GPU based on its stability and performance. You can download EVGA Precision X1 from EVGA’s website or from Steam
Step 3: Scan for Optimal Settings
The easiest way to overclock your RTX 4090 is to use the scanner feature of EVGA Precision X1. This feature will run a series of tests on your GPU and find the highest stable core clock that it can handle without crashing or artifacting.
To use the scanner feature, follow these steps:
• Click on the OC Scanner button on the top right corner of the window.
• Select “Scan” mode and click on “Start Scan”. This will initiate the scanning process, which may take up to 20 minutes depending on your GPU.
• Wait for the scan to finish. You should see a graph showing the core clock curve that the scanner has found for your GPU. The higher the curve, the better the performance.
• This will run a stress test on your GPU using the core clock curve that the scanner has found. The test will last for 5 minutes and will show you the average FPS and the temperature of your GPU.
• If the test passes without any errors or crashes, it means that your GPU is stable at the scanned core clock. You can click on “Apply” to apply the core clock curve to your GPU. You should see a green check mark next to the OC Scanner button, indicating that the overclock is active.
• If the test fails or crashes, it means that your GPU is not stable at the scanned core clock. You can click on “Reset” to revert to the default settings. You may need to lower your power limit, voltage, or fan speed to achieve a stable overclock.
Step 4: Fine-Tune Your Settings
The scanner feature of EVGA Precision X1 is a great way to find a quick and easy overclock for your RTX 4090, but it may not be the best or the highest overclock that your GPU can achieve. If you want to fine-tune your settings and push your GPU even further, you can manually adjust the parameters of your GPU using the sliders and buttons on the main window.
Here are some tips and tricks to fine-tune your overclock:
• Power Limit: This slider controls how much power your GPU can draw from your power supply. Increasing the power limit will allow your GPU to boost higher and longer, resulting in higher performance. However, it will also increase the heat output and power consumption of your GPU, so make sure you have enough cooling and power headroom. You can increase the power limit up to 125% on the RTX 4090 Founders Edition.
• Voltage: This slider controls how much voltage your GPU receives from your power supply. Increasing the voltage will allow your GPU to run at higher core clocks, resulting in higher performance. However, it will also increase the heat output and power consumption of your GPU, as well as reduce its lifespan if you go too high. You can increase the voltage up to 100 mV on the RTX 4090 Founders Edition.
• Fan Speed: This slider controls how fast your GPU fans spin to cool down your GPU. Increasing the fan speed will lower the temperature of your GPU, allowing it to run faster and more stable. However, it will also increase the noise level of your system, so you may want to find a balance between cooling and noise. You can set the fan speed manually or use a custom fan curve based on the temperature of your GPU.
• Core Clock: This slider controls how fast your GPU core runs in MHz. Increasing the core clock will improve the performance of your GPU in games and applications. However, it will also increase the heat output and power consumption of your GPU, as well as cause instability or artifacts if you go too high. You can increase the core clock by using a fixed offset or a custom curve based on the voltage of your GPU.
• Memory Clock: This slider controls how fast your GPU memory runs in MHz. Increasing the memory clock will improve the bandwidth and performance of your GPU in games and applications that use a lot of VRAM. However, it will also increase the heat output and power consumption of your memory chips, as well as cause instability or errors if you go too high. You can increase the memory clock by using a fixed offset.
To fine-tune your overclock settings, you should start with small increments and test each change with a benchmark or a game that stresses your GPU. You can use tools like 3DMark, Unigine Heaven, FurMark, or GTA 5 to test your overclock stability and performance. If you encounter any crashes, artifacts, or errors, you should lower your settings until you find a stable point. If you don’t encounter any issues, you can keep increasing your settings until you reach your desired performance or hit a limit.
Step 5: Enjoy Your Overclocked RTX 4090
Congratulations! You have successfully overclocked your RTX 4090 and boosted its gaming performance. You should now be able to enjoy higher frame rates and better graphics quality in any game you play. However, remember that overclocking is not a one-time thing. You should always monitor your system’s temperature, power consumption, and stability while gaming, and adjust your settings accordingly if needed. You should also update your drivers and BIOS regularly to ensure optimal performance and compatibility.
Overclocking is a fun and rewarding hobby that can enhance your gaming experience and unleash the full potential of your hardware. However, it also comes with some risks and challenges that you should be aware of and prepared for. Always overclock with caution and care, and don’t push your hardware beyond its.